July 2026

Kitchen

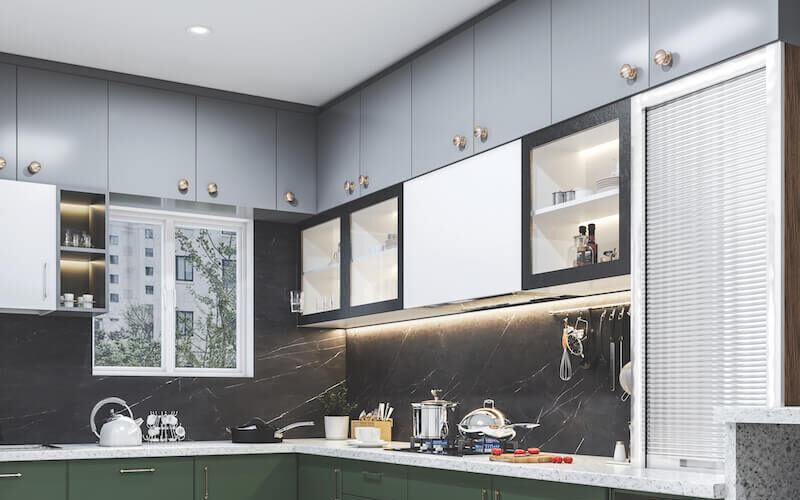
Cabinet Design Trends Elevating Modern Kitchen Spaces

The kitchen remains the undeniable heart of the home, serving as a multifunctional space for cooking, socializing, and daily family life. As interior design philosophies shift toward a balance of clean aesthetics and high-utility functionality, kitchen cabinetry has evolved beyond simple wooden boxes into architectural statements. Modern cabinet design focuses heavily on personalization, seamless integration, and innovative material choices that redefine how a kitchen looks and operates. Keeping pace with these developments allows homeowners to create spaces that feel current, sophisticated, and durable against changing trends.

The Rise of Handleless Cabinetry

One of the most defining movements in contemporary kitchen architecture is the elimination of traditional hardware. Clean lines and uninterrupted surfaces dominate modern design portfolios, making handleless cabinets an increasingly popular choice for forward-thinking homeowners.
  • Push-to-Open Technology: Mechanical or electrical push latches allow doors and drawers to pop open with a gentle touch of the knee, hip, or hand, keeping hands-free convenience at the forefront.
  • Integrated J-Pulls and Channels: Recessed grooves carved directly into the top or side of the cabinet door create a shadow line that acts as a subtle pull without interrupting the flat plane of the cabinetry.
  • Minimalist Visual Flow: By removing protruding knobs and handles, the kitchen takes on a streamlined appearance that makes small spaces feel larger and large spaces feel monumental.
This minimalist approach does more than just look sleek; it also improves kitchen safety and functionality. Without handles catching on clothing or blocking narrow walkways, navigating a busy cooking space becomes much smoother.

Embracing Natural Wood Grains and Warmth

While stark white and high-gloss gray kitchens dominated the previous decade, current design trends favor warmth, texture, and organic connections. Flat-panel and slab cabinets crafted from rich wood species are experiencing a massive resurgence in modern residential architecture.
  • White Oak and Walnut: These premier hardwoods offer distinct, linear grain patterns that add immediate organic depth to a room without overwhelming the visual field.
  • Low-Sheen Finishes: Matte and ultra-low-sheen varnishes protect the wood while preserving its natural tactile feel, allowing the authentic texture of the grain to shine through.
  • Two-Tone Layouts: Combining warm wood base cabinets with crisp upper cabinets or a contrasting island creates a balanced composition that feels grounded and dynamic.
This shift toward organic materials reflects a broader desire to bring nature indoors. Wood cabinetry introduces an element of comfort that softens the hard surfaces of stone countertops and stainless steel appliances.

Fluted Panels and Textured Surfaces

Flat surfaces still hold a prominent place in design, but dimensional texture has emerged as a major trend for homeowners looking to add architectural interest to their kitchens. Fluted, reeded, and paneled cabinet fronts transform standard millwork into bespoke artwork.
  • Vertical Fluting: Narrow, repeating grooves carved into drawer fronts or island panels draw the eye upward and add a layer of sophisticated tactile interest.
  • Strategic Accent Placement: Rather than covering every cabinet in texture, designers often apply fluting selectively to a kitchen island base, a pantry facade, or a coffee bar alcove to create a striking focal point.
  • Shadow and Light Play: Textured surfaces catch natural and artificial light differently throughout the day, creating subtle shifts in tone and depth that make the kitchen feel alive and dynamic.

Maximizing Hidden Functionality

Modern cabinetry is defined just as much by what happens on the inside as it is by the exterior facade. Homeowners demand storage solutions that eliminate clutter and optimize every square inch of available space.
  • Appliance Garages: Dedicated countertop cabinets with pocket doors or roll-up shutters conceal coffee makers, blenders, and toasters, keeping the main countertops pristine and clear of visual noise.
  • Deep Drawer Organizers: Replacing traditional lower cabinet doors with deep, pull-out drawer stacks allows pots, pans, and dishware to be accessed easily without bending down or rummaging through dark corners.
  • Integrated Charging Stations: Built-in power outlets inside drawers keep tablets, phones, and small electronics out of sight while charging, maintaining clean kitchen surfaces.
These hidden features ensure that the kitchen remains an efficient workspace while retaining the polished look of a formal living area.

Two-Tone and Color-Drenched Palettes

Monochromatic kitchens are giving way to expressive color choices that reflect personal style and create defined zones within an open floor plan. Homeowners are increasingly willing to step away from safe neutrals in favor of moody, saturated hues.
  • Color Drenching: Painting the walls, trim, and cabinetry in the exact same deep color, such as forest green, navy, or charcoal, creates a cocoon-like atmosphere that feels intentional and dramatic.
  • Earthy Mid-Tones: Terracotta, sage green, dusty olive, and muted clay tones serve as sophisticated alternatives to standard primary colors, offering warmth and versatility.
  • Contrast Islands: A popular strategy involves keeping perimeter cabinets neutral while painting the central kitchen island in a bold, contrasting shade to anchor the space.

Sustainable and Eco-Friendly Materials

Environmental consciousness plays an increasingly vital role in cabinet selection. Homeowners and designers are seeking out materials and manufacturing processes that minimize ecological impact without sacrificing durability.
  • FSC-Certified Woods: Sourcing lumber from forests managed according to strict environmental and social standards ensures that cabinetry does not contribute to deforestation.
  • Recycled and Alternative Materials: Agricultural byproducts, recycled aluminum framing, and low-emission composite boards provide durable alternatives to traditional virgin materials.
  • Non-Toxic Finishes: Utilizing zero-VOC paints and water-based sealants protects indoor air quality and ensures a healthier living environment for the household.

Frequently Asked Questions

What is the most durable wood species for kitchen cabinets?

Hardwoods such as white oak, hard maple, and hickory offer exceptional durability, high resistance to dents and scratches, and structural stability that lasts for decades.

How do I clean and maintain handleless cabinets without leaving fingerprints?

Use a soft microfiber cloth dampened with a mixture of warm water and a tiny drop of mild dish soap, followed by a dry cloth to prevent water spots and keep the finish looking pristine.

Are open shelving units replacing upper cabinets entirely?

While open shelving remains popular for displaying dishware and adding an airy feel, fully enclosed upper cabinets are still preferred by most homeowners for maximum dust-free storage capacity.

What is the difference between framed and frameless cabinet construction?

Framed cabinets feature a structural face frame attached to the front of the cabinet box, whereas frameless or full-access cabinets omit the frame, providing wider openings and easier access to storage space.

How can I update my existing kitchen cabinets without a full replacement?

You can dramatically transform your kitchen on a budget by applying a fresh coat of quality paint, swapping out old hardware for modern pulls, or replacing select upper doors with glass-front inserts.

What countertop materials pair best with textured wood cabinets?

Quartzite, honed granite, and solid surface countertops with subtle, quiet veining complement textured wood cabinets best without competing for visual attention in the room.

How do soft-close mechanisms improve the lifespan of kitchen cabinets?

Soft-close hinges and drawer slides prevent slamming, which reduces structural stress on joints, minimizes wear and tear on the hardware, and protects the cabinet boxes from long-term impact damage.

read more
Renovation

Structural Renovation Steps: What to Expect Before Demolition

Embarking on a structural renovation is an exciting milestone that promises to transform your living environment to better suit your lifestyle. However, before the first wall comes down and the hammers start swinging, a rigorous phase of planning, assessment, and preparation must take place. Jumping straight into demolition without understanding the structural realities of your home can lead to catastrophic failures, exorbitant costs, and endless municipal delays. Knowing what happens behind the scenes before the physical work begins helps homeowners stay calm, organized, and fully prepared for the journey ahead.

Conducting Initial Structural Assessments

The excitement of dreaming up a new floor plan must be grounded in the structural engineering reality of your home. Before any permits are filed or contractors are hired, a professional structural engineer or licensed architect must evaluate the property to determine what can and cannot be safely altered.
  • Load-Bearing Wall Identification: Engineers examine framing plans, roof trusses, and foundation supports to identify which walls hold up the weight of the house and which are simply non-structural partitions.
  • Foundation Integrity Checks: The baseline stability of the foundation is assessed to ensure it can handle any proposed additions or changes in load distribution.
  • Roof and Ceiling Load Paths: Experts trace how weight travels from the roof down to the earth, ensuring that removing a post or wall will not compromise the overall building envelope.
Failing to identify a load-bearing wall prior to demolition can cause sagging rooflines, cracked drywall throughout the house, or even structural collapse. Taking time for a thorough professional inspection protects both your investment and your physical safety.

Securing Permits and Regulatory Approvals

Municipal bureaucracy is often the most time-consuming part of any major renovation project. Skipping permits to save time or money is a dangerous gamble that can result in heavy fines, stop-work orders, or severe complications when you eventually try to sell the property.
Architects or general contractors typically handle the submission of detailed architectural drawings to local building departments. Plan reviewers check the documents against municipal zoning codes, electrical safety standards, plumbing codes, and structural integrity requirements. Depending on your location and the scope of the project, this review process can take anywhere from a few weeks to several months. Factor this timeline into your overall schedule so you are never caught unprepared.

Utility Disconnection and Safety Planning

When walls are opened up or removed, workers will inevitably encounter electrical wiring, plumbing pipes, and sometimes gas lines. Ensuring these utilities are safely managed before demolition day is an absolute necessity to prevent injuries, fires, or water damage.
Licensed professionals must systematically shut off and cap lines running through the renovation zone. Electricity to the affected circuits should be cut at the main breaker panel, and live wires must be safely labeled and tucked away. Plumbers will shut off water supply lines and drain the pipes if walls containing plumbing are scheduled for removal. If gas lines are present in the work area, utility providers must inspect and shut off the supply securely before any cutting or tearing begins.

Establishing Containment and Dust Control

Demolition is an exceptionally messy process that generates fine drywall dust, sawdust, and debris that can easily infiltrate every corner of your living space if proper containment measures are not implemented.
  • Temporary Dust Barriers: Contractors build heavy-duty plastic zip walls to seal off the construction zone from the rest of the inhabited house, preventing dust migration.
  • HVAC Protection: Return and supply air vents inside the renovation zone are tightly sealed to keep construction dust out of your heating and cooling ductwork, which protects your indoor air quality.
  • Floor Protection: Heavy-duty ram board or protective plastic sheeting is laid down across pathways leading to the work zone to safeguard hardwood floors and carpets from heavy foot traffic and falling debris.
Investing in robust containment keeps the rest of your home functional and livable while the chaos unfolds behind closed doors.

Creating a Temporary Living Plan

Living through a major structural renovation is stressful, and depending on the extent of the project, remaining in the house may not be practical or safe. If your kitchen, primary bathroom, or main living areas are scheduled for total demolition, you need a realistic alternative living arrangement.
Set up a temporary micro-kitchen in a spare bedroom or basement equipped with a microwave, mini-fridge, and coffee maker if your main kitchen will be out of commission for months. Pack away valuables, artwork, and sentimental items stored near the construction zone to protect them from accidental damage or thick layers of dust. Clear communication with your contractor regarding work hours and access points will help maintain your sanity while your home undergoes its transformation.

Frequently Asked Questions

How long does the pre-demolition planning phase typically take?

The planning, architectural design, engineering review, and permitting phase usually takes anywhere from two to six months depending on municipal backlogs and project complexity.

Can I live in my house while load-bearing walls are being removed?

It is often possible to stay in the home, provided the construction zone is sealed off, but expect significant noise, dust, and temporary disruptions to utilities like water and electricity.

What happens if hazardous materials like asbestos are found?

If asbestos, lead paint, or mold is discovered during pre-demolition testing, specialized abatement contractors must safely remove and dispose of these hazardous materials before general demolition can proceed.

Do I need a general contractor, or can I manage subcontractors myself?

Managing a structural renovation requires deep technical knowledge of building codes and scheduling; hiring a licensed general contractor is strongly recommended to coordinate engineers, electricians, plumbers, and inspectors.

How do I protect my furniture from heavy construction dust?

Move all furniture entirely out of the renovation zone, and seal items in adjacent rooms with breathable fabric covers or plastic sheeting taped securely along the baseboards.

What is the financial risk of starting demolition without a permit?

Building departments can issue immediate stop-work orders, impose steep fines, and require you to tear down finished work so inspectors can view the underlying structure, driving up project costs dramatically.
read more
Decor Tips

Open-Plan Living: Interior Design Strategies for Cohesive Zones

The concept of open-plan living has fundamentally shifted how we interact with our homes. By removing walls that once partitioned cooking, dining, and relaxing areas, architects and designers have created spaces that feel lighter, larger, and more socially connected. However, the absence of physical barriers often introduces a new design challenge: how to maintain a sense of order and purpose in a massive, undivided room. Without careful planning, an open-plan space can quickly feel like an unorganized furniture warehouse. Successful open-plan design relies on creating distinct functional zones that feel separate enough for their specific use while remaining visually linked through a cohesive design thread.

Establishing Visual Continuity

The most important step in managing an open-plan layout is ensuring that the disparate zones share a common language. If the living room features dark, moody industrial decor while the kitchen embraces a bright, coastal aesthetic, the eye will struggle to find a place to rest. You must develop a unifying color palette that flows throughout the entire expanse.
You do not need to use the exact same color in every corner, but you should stick to a consistent base of neutrals that tie the zones together. From there, you can introduce accent colors that evolve as you move through the space. For example, a navy blue sofa in the living area can be echoed by navy cabinet hardware in the kitchen and a navy patterned runner in the dining area. This repetition signals to the brain that these spaces belong together, creating a sense of harmony that allows the room to breathe.

Defining Zones Without Walls

Once you have established visual continuity, the next challenge is to clearly define where one zone ends and another begins. Since you cannot rely on walls to provide these boundaries, you must use furniture, flooring, and lighting to create “virtual” partitions.

Rugs as Anchors

Area rugs are the most effective tool for grounding furniture arrangements. A large rug placed under the living room sofa, coffee table, and armchairs creates an immediate “room within a room” effect. By keeping all the furniture feet on the rug, you visually contain the conversation area. Conversely, leaving the floor bare between zones helps define the transition, suggesting a natural walking path that prevents the space from feeling cramped.

Furniture Placement

The backs of sofas, console tables, and bookcases act as excellent room dividers. Placing a sofa with its back toward the dining area creates a solid barrier that separates the two zones without blocking light or sightlines. A slim console table placed behind the sofa provides a surface for books or lamps, adding a functional layer that reinforces the edge of the living zone.

Ceiling and Lighting Treatments

Lighting is a powerful way to denote function. A grand pendant chandelier over the dining table makes that area feel intimate and special, while recessed lighting can provide the ambient glow needed for the kitchen. By using different lighting types for different zones, you create a hierarchy of spaces that tells the inhabitants exactly what that section of the room is intended for.

Balancing Function and Aesthetics

An open-plan home is often the hub of family activity, which means it must be highly functional as well as beautiful. The biggest mistake in large, open spaces is clutter. Because the entire floor is visible at once, any stray toys, piles of mail, or dishes in the sink can dominate the entire visual field.
Prioritize closed storage solutions that blend into the wall color. Floor-to-ceiling cabinetry or built-in media units allow you to hide the necessities of daily life, keeping the sightlines clear. When selecting furniture, opt for pieces that offer storage, such as ottomans with lift-up tops or dining benches with internal compartments. This reduces the need for secondary storage units that can clutter the walkways between your zones.

The Role of Scale and Proportion

In a large open-plan room, furniture that is too small can look like it is floating aimlessly. You need to choose pieces that have enough physical presence to hold their own in a wide-open area. A single, delicate side chair in a large room will look lost, but a substantial section sofa or an oversized dining table provides the visual weight necessary to anchor the space.
Consider the flow of traffic. You should be able to move from the kitchen to the dining room and then to the living room without maneuvering around sharp corners or tight bottlenecks. Keep the walkways clear and ensure that your furniture arrangement follows the natural lines of the architecture. If your home has a large window wall, orient your living room layout toward the light, ensuring that the furniture supports the view rather than fighting against it.

Introducing Texture and Variety

While unity is essential, it is equally important to prevent the space from becoming boring. You achieve this by layering textures. In an open-plan room, the floor is usually a significant feature because it spans the entire space. If you have the same flooring throughout, you can add texture through your rugs, window treatments, and upholstery.
Use different fabrics to differentiate the zones. Perhaps the living room features plush velvet upholstery for comfort, while the dining area utilizes crisp, easy-to-clean leather chairs. The contrast between these materials adds depth and interest without disrupting the overall color scheme. Consider the wall finishes as well. A feature wall with wood paneling or an interesting wallpaper behind the dining table can mark that area as distinct from the living room, adding a layer of architectural detail that prevents the walls from feeling like a continuous, endless tunnel.

Managing Acoustics in Large Spaces

One common complaint in open-plan homes is noise. Without walls to absorb sound, the clatter of pots and pans in the kitchen can easily drown out conversation in the living room. Soft furnishings are your best defense against echoes. Incorporate heavy curtains, area rugs, throw pillows, and even upholstered wall panels to absorb sound. These elements not only make the room feel cozier but also act as acoustic buffers that improve the comfort of the space for everyone.

Frequently Asked Questions

How can I make an open-plan space feel more intimate?

Use lighting to create pools of warmth, incorporate tall plants to provide vertical interest, and arrange furniture in circular or conversational groupings rather than pushing everything against the perimeter walls.

Is it a bad idea to use different flooring materials in an open-plan area?

While consistent flooring creates a larger, more seamless look, using different materials like tile in the kitchen and hardwood in the living area can effectively define the boundaries of each zone. Just ensure the transition strips are flush and the colors complement each other.

What is the best way to hide kitchen clutter from the living area?

Incorporate a kitchen island with a raised breakfast bar that acts as a visual shield, or use floor-to-ceiling pantry cabinets to store appliances out of sight when not in use.

How can I maintain a cohesive style if I enjoy multiple design aesthetics?

Choose a neutral color foundation to hold the space together, then express your diverse interests through accessories, artwork, and small decorative items that can be grouped within specific zones.

Should all my furniture in an open-plan room be from the same collection?

Mixing pieces from different eras or styles is often more visually interesting than using a matching set. As long as the scale, color, and texture of the pieces relate to one another, they will work together successfully.

How do I define a home office zone in an open-plan living room?

Use a dedicated rug for the desk area, choose a desk that fits the aesthetic of your living room furniture, and use a floor lamp or a focused pendant light to separate the workspace from the lounge area.

How do I stop my large living room from feeling like a waiting room?

Use rugs and lighting to create defined groupings, bring in varying heights with bookshelves and plants, and ensure that the back of your primary sofa serves as a clear border for the room.
read more
Renovation

The Ultimate Timeline for Planning a Major Renovation

Taking on a major home renovation is an exhilarating undertaking that can completely redefine your living space, improve functionality, and significantly increase property value. However, rushing into construction without a structured timeline is a recipe for budget overruns, missed deadlines, and severe stress. Successfully navigating a large-scale remodel requires breaking the entire journey into distinct, manageable phases. By following a clear chronological roadmap from initial conception to final walkthrough, you can keep your project organized, efficient, and on track.

Phase One: Vision and Budgeting

Before you contact a single contractor or browse design magazines, you must establish the financial parameters of your project. Financial clarity dictates every subsequent decision you will make throughout the renovation process.
  • Determine Your Maximum Budget: Calculate how much cash you have available, research home equity loan options, and secure pre-approval from lenders if you require financing.
  • Build a Contingency Fund: Set aside an extra twenty percent of your total estimated budget specifically to cover hidden structural surprises or material price fluctuations.
  • List Your Must-Haves Versus Nice-to-Haves: Differentiate between essential structural upgrades and luxury cosmetic finishes so you can prioritize spending if costs run high.
Spending adequate time in this initial brainstorming and budgeting phase prevents you from halting construction halfway through due to a depleted bank account.

Phase Two: Assembling Your Professional Team

Attempting to manage a major renovation entirely on your own can quickly become overwhelming, especially when structural or mechanical changes are involved. Assembling the right team of professionals ensures your home meets safety standards and local building codes.
  • Hire an Architect or Designer: If your project involves moving walls, changing rooflines, or altering room layouts, professional design drawings are mandatory for both permits and construction accuracy.
  • Interview General Contractors: Meet with multiple licensed contractors, review their past portfolios, check references, and ensure they carry proper liability and worker compensation insurance.
  • Consult Specialized Trades: Depending on the scale of your remodel, you may need independent structural engineers, electricians, or plumbers to evaluate the existing infrastructure of the house.
Establishing clear communication channels with your chosen professionals early on sets expectations and builds a cooperative working environment for the months ahead.

Phase Three: Design, Permitting, and Material Ordering

With your team in place, the physical design takes shape on paper. This phase bridges the gap between creative concepts and legal authorization to build.
  • Finalize Architectural Drawings: Review blueprints in detail to confirm every electrical outlet, door swing, and cabinet dimension aligns with your daily lifestyle needs.
  • Submit Plans for Municipal Approval: Your contractor or architect will file the construction documents with the local building department to secure necessary permits. This review stage often takes several weeks or months.
  • Order Long-Lead Materials: Custom cabinetry, imported tiles, specialized windows, and designer plumbing fixtures often feature lengthy manufacturing and shipping delays. Ordering these items well in advance prevents costly construction standstills later.

Phase Four: Preparation and Demolition

Once permits are officially approved and all preliminary materials sit safely in storage, physical work can finally begin on site.
  • Pack and Move Out: If the renovation encompasses major living areas like kitchens or bathrooms, establish a temporary living arrangement or set up a secure, dust-free micro-living zone within the house.
  • Protect Personal Belongings: Move all remaining furniture, artwork, and electronics away from the construction zone, sealing adjacent rooms with heavy-duty plastic containment barriers.
  • Execute Controlled Demolition: Contractors tear down targeted walls, strip old flooring, and clear out outdated fixtures while inspecting exposed framing for hidden water damage, mold, or electrical hazards.

Phase Five: Rough-In Construction

The rough-in phase is where the unseen bones of your new space are constructed and updated to modern building standards.
  • Framing: Crews build new interior walls, adjust door headers, and reinforce structural ceiling or floor supports according to the approved engineering blueprints.
  • Mechanical Systems: Electricians run new wiring, plumbers install fresh supply and drainage lines, and HVAC technicians duct heating and cooling units through the newly opened wall cavities.
  • Municipal Rough-In Inspections: City inspectors visit the property to verify that all electrical, plumbing, and framing work complies with local safety codes before drywall can be installed.

Phase Six: Finishes and Final Walkthrough

The final phase brings the visual elements of the project together, transforming a construction site back into a polished home.
  • Insulation and Drywall: Install thermal insulation in exterior walls, hang drywall sheets, tape seams, apply joint compound, and sand surfaces smooth for painting.
  • Interior Finishes: Paint walls and ceilings, lay down final flooring materials, install interior doors, mount custom cabinetry, and set plumbing fixtures and light switch plates.
  • Punch List and Final Inspection: Walk through the completed space with your general contractor to create a punch list of minor touch-ups or adjustments, followed by a final building department inspection to close out your permits successfully.

Frequently Asked Questions

How far in advance should I start planning before construction begins?

For a major home renovation, you should begin planning, budgeting, and designing anywhere from six to twelve months before the physical construction crew breaks ground.

What causes the most common delays in a renovation timeline?

Supply chain delays for custom materials, slow municipal permit approvals, and unexpected structural issues discovered behind opened walls are the primary culprits behind timeline extensions.

Should I order appliances before construction starts?

Yes, order major appliances early and store them safely because cabinet dimensions and electrical or plumbing rough-ins must be precisely measured to fit your specific appliance models.

How do I handle disputes with my general contractor over timeline delays?

Refer back to the payment schedule and milestone deadlines outlined in your signed contract, maintain all communication in writing, and address concerns calmly before they escalate.

Can I make design changes once construction is already underway?

Mid-project changes, known as change orders, are possible but almost always result in added costs, material restocking fees, and significant delays to your overall timeline.

What is a punch list during the final phase of a renovation?

A punch list is a detailed inventory of minor flaws, incomplete items, or cosmetic touch-ups that your contractor must resolve before final payment is released and the project is officially signed off.
read more